|
|
Hints & Tricks 2: How to build a tree for a diorama? |
 |
by Georg Schachinger |
| |
| |
For Diorama makers it is always important, if not only city scenes are represented,
that nature is also made detailed and reliable. One states frequently that
the best materials for this purpose always come from nature. Even details,
as leaves can be represented by means of filigree plants. Thus there is
for example a bush, which branches indicate smallest branching. It is the
so-called "sea foam". One can buy it in a marked garden or harvest
it in the sea if one knows the places, where to look.
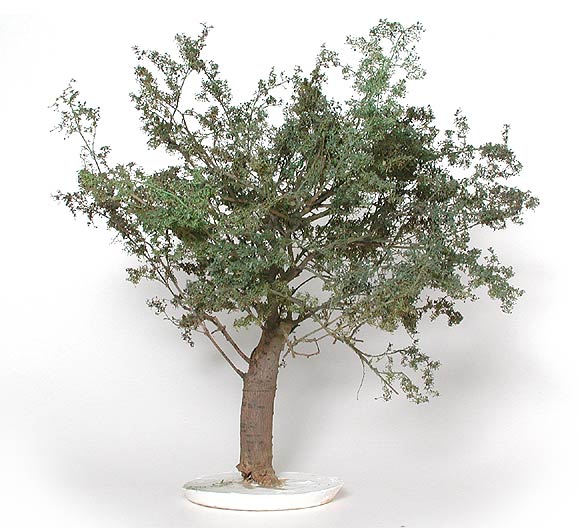
The tree is not so difficult to achieve: For what reasons are there the
Japanese and "their Bonsais"? Of course that a model construction
amateur has something that looks like a tree at 1:35-scale! These plants
are best procurable in a DIY store. Sometimes there are already dried ones,
which are only thrown away anyway. Speak with the responsible person in
the garden department and he will store them for you. Nowadays even new
small trees cost no fortune any more (in any case fewer, than a Verlinden
product!).
 preparations preparations
|
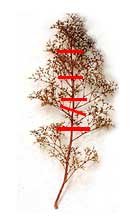
First the earth is removed and
the tree is cleaned. Then one removes its roots, the leaves and all thin
branches from the Bonsai with a Dremel Minidrill and a saw blade socket.
The result should look similar to image 1.
Into the so obtained snags, one then has to bore holes for the incorporation
of a piece of wire. The branches of sea foam are then divided into individual
segments. Many small branch parts should be the result, as represented in
image 2.
|
|
 |
 |
| Image 1 |
Image 2 |
|
|
|
Composition
The composition proceeds now on your own creation: the sea foam sections
are attached to the snags of the Bonsais with wire ends. One should change
gradually from leafless branches at the trunk far up to branches with leaves
at the area of the treetop. Depending upon the thickness of the branches
of the sea foam you have to select the strength of the wire. The further
outside from the trunk, the more thin it must be, since it might not fit
into the opening of the stems. Afterwards one must treat the junction points
between Bonsai and branches, or between the branches with Cyanoacrylat instant
glue. With my example it concerns approx. 40 junction points. As one can
estimate, patience with this procedure is necessary!
At the junction points one should seal possible gaps with high-viscosity
adhesive. After spraying the tree with diluted white glue (atomizers from
your dear wife's stock are best suitable for this) I have sprinkled the
tree with dried leaves, that were crushed in a mortar. If one holds a paper
under the tree, one can use surplus material for further runs. |
 |
| |
| |
|
|
|
|
|
| |
|
|
|
|
|
| |
dark brown: Bonsai, pale brown: sea foam,
blue: wire |
|
| |
|
|
| |
|
|
| |
 |
|
| |
|
|
|
|
|
|
painting
First I hand painted the tree with different brown tones, especially the
interfaces of the branches and the green branches of the sea foam. Then
I sprayed the leaves with the airbrush in different green tones and semi
dull varnish. Both the appearance, and the durability of the tree improve.
Picky ones can do those by spraying from a direction above the tree in darker
green and from a position below in brighter green, to simulate the differences
in color of the upper and lower surface of natural leaves.
However I skipped that. It is not a problem at all that leaves adjacent
to the branches or stems partly take over a green cast. This looks as if
the branch would be somewhat moss covered or are still young, green branches.
The trunk was painted with artist's oil colors and - still in the drying
phase - dry brushed with brighter brown tones. |
|
|
|
|
|
|
|
| |
meet the author |
|
|
|
| |
Georg Schachinger |
|
|
|
| |
|
|
|
|
| |
My name is Georg Schachinger
and I was born in 1964 in Upper Austria. I have done modelling
since I was 14. However only since 1998 I´m seriously concerned
with the topic of tank-, vehicle-, diorama- and figure construction.
Especially I prefer constructing scratch built vehicles. This
leads to somehow strange projects, as there were a selfmade
interior compartment of a StuG III and a bow-section of a Mark
IV, although these items could have been bought as well...
Anyhow: scratching is more fun, then buing and cheaper. Further
hobbies are: Karate and reading military history. |
|
 |
|
| |
|
|
|
|
| |
Email:  wikingers.panzermodellbau@gmx.at wikingers.panzermodellbau@gmx.at |
|
|
|
| |
|
|
|
|
|
|
|
|
This page: THEMES: Hints & Tricks 2: How to
build a tree for a diorama? - by Georg Schachinger
was last modified on: Mar 11, 2002
The URL of the page is: http://www.rlm.at/cont/thema10_e.htm
© Copyright www.rlm.at
and the contributing author(s). All Rights Reserved. Used with permission.
Terms of use: All material within this site is protected under copyright
and may only be reproduced for personal use. You must contact the Author(s)
and/or Editor for permission to use any material on this site for any purpose
other than private use! |
| |
|