|
|
Jagdpanther - Sd.Kfz. 173 |
 |
built by Andreas Tupy (1:35) |
| |
| |
In 1943, the High Command began to think about how one could effectively
deal with the heavy Russian armor at distances that would make the range
of their guns fall short. The simple answer was to take the 8.8 cm flak
and incorporate it into an anti-tank vehicle. The first of these was the
Nashorn (on a Panzer IV chassis). The problem was that the armor was too
thin and it was open in the rear and on top which afforded little protection
for the crew.
Further failures were experienced with the Tiger chassis of the Porsche
production run (Ferdinand and Elefant). They were too slow and heavy. Finally
the chassis of the Panther G was tested and proved very successful. Thus
the anti-tank "Jagdpanther" was born. It received as its primary weapon
the new single part 8.8 cm Pak 43L/71 (later the two part 43/3/L71) the
gun with the most penetrating power in the German arsenal. The speed was
50kmh, the engine a Maybach HL 230 P 30 with 700 Ps of horsepower. The weight
was 45.5 tons and despite that it was quite fast and maneuverable. 328 units
were produced by MIAG and MNH.
This Hunting Panther is still considered a masterpiece of tank construction
today. |
 |
| |
 The
Model The
Model
The kit from Tamiya is molded in their usual beige polystyrene and looks
good upon first examination. Even the vinyl tracks are nicely done but not
usable for my purposes.
The
Construction
I used the following after market items: Hunting Panther by Tamyia,photo
etch by Aber, tracks by Friulmodel and barrel by Eduard. Well, where does
one begin? I began with the study of as many historical photos as I could
find and the reading and evaluation of available literature. I decided from
the beginning to do a "Jagdpanther" of a rather late vintage: the one with
the bolted gun shield, the tool box and barrel cleaner in rear which was
also intended for antenna stowage, with the heater in the crew area as well
as the upper hatches and the opening for the driver's periscope.
After a dry fitting of the rear parts of the kit and the study of the photo
etch instructions, I began with the rear of the vehicle. First I installed
the brackets for the wire cutter, the C-hook, the starter hand crank and
the lift jack. The headlights were a special challenge since they were completely
formed from photo etch but the lamp had to be scratch built. I used a round
clear piece of sprue and gave it a cylindrical shape. After that I joined
he rear lower and upper parts together, I began to detail the interior of
the upper superstructure. Mainly this encompassed the installation of the
periscope and the base for the commander's figure as well as the painting
of the interior ivory color. After the upper part was dry the two main parts
were joined and then filling and sanding cannot be avoided.
I also could not ignore to provide the model with surface texture which
is a by product of the manufacturing process and after that I removed the
more obvious surface defects with fine sand paper. I followed this up with
the production of welding seems from thin and heated stretched sprue. Then
I finally tackled the rest of the upper superstructure. Since I started
to get bored I decided to replace the hatch locks with photo etch as well
as the winch. Eventually all of this was finished and I put the superstructure
aside and concentrated on the wheels as the track. Oh, I also added the
gun barrel. |
|
| |
Painting
In order to achieve contrast I airbrushed the tank lightly with black. After
this had dried I used Tamiya dark yellow as my base color. I made sure that
all the black shadows did not disappear under the yellow. I set the model
aside for two days and started to work on the Friul tracks. Again I airbrushed
them black and then lightly over sprayed them with a thinned red brown in
order to get the first effect of weathering. The camouflage scheme was next
and after all this had dried well, the usual weathering techniques such
as dry brushing and washing etc. was applied. Only then did I begin to install
the wheels which had all been painted and weathered. Finally, I added the
finished and weathered tracks.
Final
touches
Finally the tank stood on its "own feet". And now one can begin to paint
the fine parts that ones added as an afterthought but which give the tank
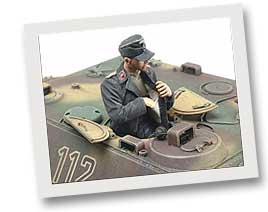
special character. I left it at a few additions. The last touch was to add
the commander figure to the turret to give the thing a little life. In order
to achieve more realism I added earphones and a throat mike made with photo
etch. The cables were made with stretched sprue. A layer of clear matte
was the last touch and the tank was ready for the display case.
Comments
Overall this was an easy to build model and one that looks good when finished.
Important is the correct placement of the brackets for the particular version
you are building. The "Schürzen" should be replaced with Aber photo
etch because Tamiya's are much too thick. The container for the gun cleaner
demands some attention because it can be placed either on the left side
or on the rear of the tank. The last choice is a field modification. There
are many possibilities and nothing is written in stone. Does it matter whether
the angle plate was remounted after conversions took place on the tank? |
|
| |
| |
|
|
|
| |
| |
| |
|
|
|
|
|
|
|
| |
meet the modeler |
|
|
|
| |
Andreas Tupy |
|
|
|
| |
|
|
|
|
| |
Born 1977 in Vienna. After
I got an aeroplane kit when I was a five years old boy, I did
not come loose from this passion for a long time, until I inserted
a break of many years because of my modified interests. In 2001
I again bought a kit (king tiger from Tamiya) and lightning
struck again: Since that time I am concerned very seriously
with the topic tank modelling and construction, whereby I often
spend hours to search for suitable reference material. My emphasis
is with the models of the German Wehrmacht.
Beside modelling i discoverd another interesting passion: photographing |
|
 |
|
| |
|
|
|
|
| |
Email:  andreas_tupy@hotmail.com andreas_tupy@hotmail.com |
|
|
|
| |
|
|
|
|
|
|
|
|
 |
 |
This page: GALLERY: Jagdpanther - Sd.Kfz.173, built
by Andreas Tupy
was last modified on: Mar 4, 2005
The URL of the page is: http://www.rlm.at/cont/gal09_e.htm
© Copyright www.rlm.at
and the contributing author(s). All Rights Reserved. Used with permission.
Terms of use: All material within this site is protected under copyright
and may only be reproduced for personal use. You must contact the Author(s)
and/or Editor for permission to use any material on this site for any purpose
other than private use! |
| |
|


